{DIY} baby onesie makeovers

This week I decided to do something to prepare for this next baby’s arrival since he could show up any time now! Having boy #3 doesn’t leave you with much to shop for, so instead I decided to give some old onesies new life using some fabric scraps I already had (cost = $0). These are really simple and such a fun way to customize some things for a little one! Also a great use of ‘old’ clothes given new life – recycling at it’s finest!

photo(1)
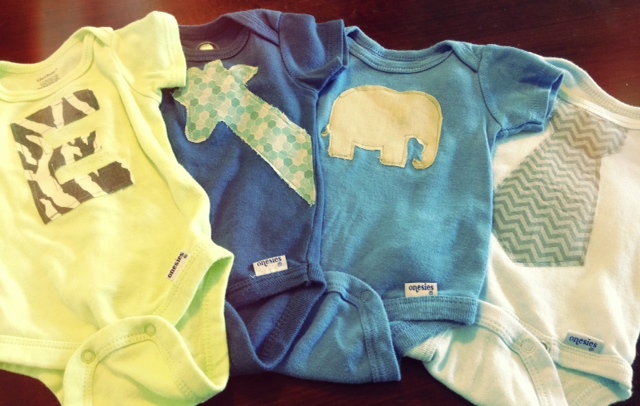
These all had previous designs that were a little boring and outdated, so I simply picked some new ones that would cover what was already there. (and NO we haven’t finalized a name for this baby yet, but figured an “E” would be a safe bet) ; )

4 steps to a {DIY} Onesie makeover

  • Print out a template using any clip art silhouettes or font in the size that you want, cut the shape out and trace it onto fabric heat transfer paper (this is the one I use)
  • Iron the transfer paper onto your fabric scrap and cut the shape out
  • Position the shape (heat transfer side down obviously) on your onesie where you want it and iron it in place according to the product instructions.
  • Outline the design with a simple stitch for extra reinforcement and to prevent any peeling and fraying. (this may be optional, but I haven’t tried it without the stitching so not sure how it would hold up through washings?)

This also works GREAT for custom burp cloths, blankets, etc!

{DIY} natural bum paste!

The {DIY} project today…home made diaper cream! This {DIY} has been a huge success and I can honestly say I will not be buying diaper cream from the store ever again! It works great, smells great and mostly importantly is SAFE to use on my little ones. You will be happy to know exactly what is in your cream, especially when your 2 year old decides to open it up and rub it all over himself (that may or may not have happened here yesterday) 🙂diaper rash cream

This stuff is so easy to make, and my 3 year old loved helping.
Recipe adapted from www.mymerrymessylife.com

What’s in it:

  • 1/2 c raw organic Shea butter
  • 1/4 c raw organic coconut oil
  • 1 Tbsp organic beeswax pastilles
  • 2 Tbsp zinc oxide powder (can omit if using cloth diapers)
  • 1 Tbsp pure aloe vera gel
  • 10 drops lavender essential oil
  • 8 drops melaleuca essential oil
  • 4 drops peppermint essential oil

STEP 1:
heat the shea butter, coconut oil and beeswax in double boiler over med heat until liquified. Remove from heat and let cool slightly (just so the temp is lower).
STEP 2:
Pour into stand mixer and add zinc powder, aloe and whip on high until smooth and completely blended. Drop in essential oils (make sure the mix is no longer hot as heat can break down the therapeutic properties of the oils).
STEP 3:
Mix thoroughly and pour into containers. Glass containers are best as the essential oils can break down plastic over time. Makes appx 8 oz of cream so I divided into two 4 oz glass jars. It will be thin when you pour it, but will thicken up quickly as it cools, so don’t plan on moving it to different containers after cooling 🙂 I keep a small one in the diaper bag, and at each changing station throughout the house!

The oils are are moisturizing and calming and soothing to baby’s skin. The zinc provides an excellent wetness barrier. The combination of ingredients is perfect for the little bums, and you may want to rub it on your arms and hands while you’re at it 🙂 If you like the recipe, I’d suggest doubling it next time and stocking up!