Young Coconut Green Smoothies

This is tropical perfection in a cup! While working with fresh young Thai coconuts may be intimidating, it is quite easy, and the health benefits of coconuts are an amazing addition to your morning smoothie. Coconut water is a great source of potassium (as much as 4 bananas) and is chock full of minerals that your body needs to function optimally. The white ‘meat’ of the coconut is a great source of fiber and medium chain fatty acids (healthy fats), which your body uses for energy, healthy skin and proper brain function!

For this creation, you will need…

  • Fresh young Thai coconut
  • 2 cups of organic baby spinach
  • 4-5 pitted dates
  • 1 Tbsp organic vanilla extract
  • handful of ice
  • 1 tsp organic cinnamon

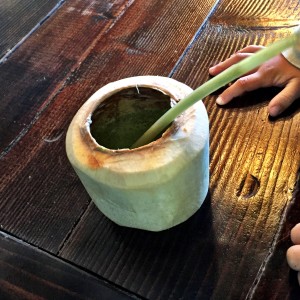
First you need to crack open the coconut. IMG_8899
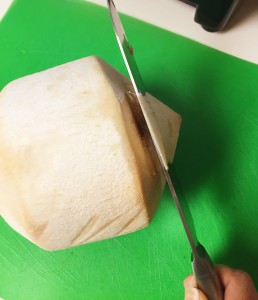
It’s not as hard as it sounds, but it does take some getting used to. Find the largest, sharpest knife in the kitchen (assuming you don’t have a machete handy). Start at the point and cut away the white part until you uncover the entire top of the brown nut inside.

IMG_8900
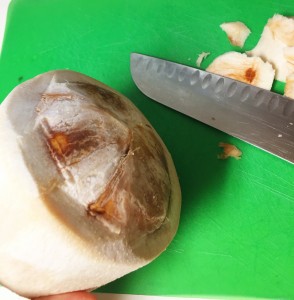
At this point be CAREFUL NOT TO LOSE YOUR FINGERS and take the bottom corner of the knife and drive it into the base of the top a few times (careful not to spill out the water once you break into it). Once you get a good crack, you can wedge your knife in and pop the top right off like a lid (coconuts completely amaze me).
Carefully pour the coconut water into your vitamix or blender (maybe drink a few sips along the way because it is delicious stuff). Take a large spoon and then scoop out the white ‘meat’ from the inside of the coconut. Scoop it all out into your blender. Add in spinach, vanilla, cinnamon, dates (to sweeten), and ice.

Blend on high speed until completely pureed. I like to add in our Wild Orange flavored liquid Omega 3s (these are critical for my little ones) and pour them into fun cups. (The omegas will change the flavor into more of an orange creamsicle, so those can be omitted if you don’t want that flavor.) One lucky kid gets the smoothie served back out of the coconut shell. There is nothing better than the taste of fresh coconut to start out your morning feeling happy and healthy! Let me know if you try this, or have any questions!IMG_8879

Instant Pot gluten free pumpkin bread pudding

This is sooooo good. I had heard of people making pumpkin pie and bread puddings in their instant pot, so I decided to merge the two and see what happened. It was a huge hit!

Disclaimer: this is NOT a super fast cooking recipe

Here’s what I used:

  • 6-8 pieces of Udi’s gluten free cinnamon raisin bread
  • 4 eggs
  • 2 Tbsp melted butter
  • 1/2 cup organic sugar
  • 1 Tbsp organic cinnamon
  • 1 tsp organic vanilla
  • Dash salt
  • Dash nutmeg
  • 2 drops cassia essential oil
  • 1 can organic pumpkin purée
  • 1 cup of whole milk or 1/2 milk, 1/2 cream
  • 2 cups of water (for steam in instant pot)

Grease the inside of a baking dish that will fit in your instapot (I used a 1 1/2 qt stoneware dish).

Cube bread and fill dish. Drizzle melted butter over the bread cubes (this step can be omitted if you want it a little more cake-like).

In my kitchen aid, I beat 4 eggs with the sugar until mixed, added vanilla, cinnamon, nutmeg, salt & cassia. Mix well and stir in 1 can pumpkin purée, then pour in milk and mix until blended.

Pour pumpkin mixture over bread cubes and let is sit for a few minutes or tap it down to let it absorb into the bread and let some air bubbles out.
img_8876.jpeg
Cover the dish with foil and make a foil sling to make it safer and easier to lift the pot when it is done. (This is basically just a long strip of foil folded into a 1-2 inch thick ribbon and placed around the pot so you can grab it and lift it out at the end).

Insert the steamer rack and pour in 2 cups of water into the instant pot. Set the dish into the pot and set it on manual for 35  minutes at high pressure.

Let it naturally release for about 5-10 minutes and then manually release the pressure to open the lid. Carefully remove it using the sling pieces (the steamimg_8881.jpeg below is super hot).

Uncover and serve topped with whipping cream or organic yogurt. We used vanilla soy yogurt as a dairy free option (due to allergies we can only have dairy when baked. I used real cream in the recipe but you could sub if needed). The yogurt flavor compliments it best in my opinion.

Excellent for dessert or even a yummy breakfast!

dinner simplified: the instant pot

 So I’ve heard just about everyone I know raving about this thing, but I have been a skeptic. With our upcoming move, we are making long lists of things (and appliances) we will live without, but our life on the road also comes limited cooking options. We will have a nice little kitchen, but giving up my slow cooker and rice cooker made me cringe. How was slaving over dinners each night and regressing in that convenience going to help us with our goals for simple living and more family time?

The instant pot may be our new best friend. The verdict is still out. It has been a bit intimidating, I’ll admit, but I know if I sit back and let this thing scare me it won’t do us any good. So we jumped in with 2 feet. The first 4 hrs we had it made soft boiled eggs, chicken breast, oatmeal and rice…..and it was all fantastic!

Cons:

1) I’m rather (hugely) disappointed in the app with recipes that comes with this model. There are about 20 things to make and with our diet even fewer options. I am going to start documenting my own and adding my own into the app so that should not be a deal breaker.

2) My biggest hangup so far is the time it takes to come to full pressure and actually start the ‘short cooking time.’ I find the more that is in the pot, the longer it takes to heat, so my 9 minute pot of soup tonight took 30 minutes to get to full pressure. Not super duper speedy, but it was still convenient to dump it all in and let it go.

Pros:

1) the ability to dump it in and walk away is priceless when chasing 3 little boys around.

2) When traveling, the versatility and efficiency of this will be amazing! It’s a slow cooker, rice cooker, pressure cooker and extra burner all in one.

3) throwing in completely frozen meat and ending up with perfect results is nothing short of miraculous. Dinner time always sneaks up on me, and this has saved me from having to plan ahead or sacrifice healthier options.

I will post recipes as we go. Stay tuned! What are your favorite recipes and tips?

Sweet Potato Pumpkin Soup

I can’t get enough of real food, clean, allergen free soup and stew recipes. It is such a wonderful healthy comfort food when the weather is cold, but also packs full of immune boosting ingredients to help keep us functioning optimally. To be honest, I don’t remember where this recipe originated since I modified it based on a recipe I found many many years back, but it has become a favorite in our family and gets rave reviews from guests. It’s healthy (spare the cream) and the perfect flavors of fall and winter for a stand alone meal or as an appetizer to any dish.  Enjoy!

  • 1 tablespoon coriander seeds, crushed
  • 2 teaspoons cumin
  • 2 teaspoons dried oregano
  • 1 teaspoon fennel seeds
  • 1/4 teaspoon crushed red pepper

(Or substitute spices with doTERRA essential oils – 1 drop coriander, 2 drops cumin, 1 drop oregano, 1 drop fennel, 2 drops black pepper) *most essential oils cannot be ingested so please do not do this with another brand. These have been tested for safety.

  • 2 cloves garlic
  • 1/4 teaspoon salt
  • 1/2 teaspoon black peppercorns, ground
  • 1 tablespoons olive oil
  • 1 can (15 oz) pumpkin
  • 2 large sweet potatoes, cooked and peeled
  • 1 yellow onion, chopped
  • 1 large box or jar chicken broth  (or veggie broth if you want it vegetarian) – homemade bone broth is excellent base for all your soups and stews
  • 1/4 tsp. nutmeg
  • 1/4 tsp. white pepper
  • 1/2 cups heavy cream or 1 stick butter (optional)

Cook sweet potatoes (I prefer cooking them in the instant pot), allow to cool enough to peel, remove skins.

In a spice grinder, grind all spices together into a coarse powder. (or just use the oil drops)

Sautee onion and crushed garlic in olive oil over medium heat until onion is soft.

Combine sweet potatoes, pumpkin, spices, cooked onion/garlic and chicken stock in blender. (may have to divide into batches if making a large quantity)

Once blended, pour mixture into large pot on stove and cook over medium heat until thoroughly heated.  Consistency can be adjusted with more/less broth.  (Heavy whipping cream and/or a small amount of sour cream can be added for extra yummy & creamy soup, but not necessary)

Pour heated soup into bowls and garnish with sour cream and fresh parsley if desired.

authentic tiramisu

Screen Shot 2016-01-05 at 3.01.52 PMThis stuff is AH-MAZING! Because I need to remember this, here is what I did and how I did it for next time.

NOTE:: this is NOT EVEN REMOTELY ALLERGEN FREE or healthy, but if you can have eggs, dairy and wheat, it’s to die for

  • 2 packages lady fingers (though if I can find the authentic cookies instead of the spongy stuff they sell here it will make this dish even better)
  • 2 cups (16 oz) cold brewed espresso
  • 2 Tbsp cocoa powder (divided)
  • 1/4 cup Brandy
  • 6 eggs (separated into yolks and whites)
  • 2 containers (16 oz total) of Marscapone cheese
  1. Make the espresso the night before and store in the fridge. You HAVE to have this super strong high quality coffee or espresso – regular coffee just won’t cut it. Cold press was so easy (fill about 1/3 of the press w grounds and 2/3 water) to get that strength.
  2. Next day, take out eggs and Marscapone and bring to room temp
  3. Pour espresso into a shallow dish. Add in brandy and sprinkle with 1 Tbsp cocoa powder
  4. in a CLEAN and cold bowl, whisk egg whites and 1 Tbsp sugar until stiff peaks form. I learned the hard way you can NOT whisk egg whites in the bowl that has any of the yolk in it, so make sure to do the whites first in the clean bowl.

    {On a side note, the semi-foamy sweet egg white flop made some killer french toast soak, but this is much faster and easier if you do it right the first time}

  5. Gently transfer over to new bowl (so you can keep using the kitchen aid bowl), then whip egg yolks with 3 Tbsp sugar until foamy. blend in all Marscapone until smooth and creamy. Then gently fold In the egg whites mixture until blended
  6. Dip lady fingers quickly into espresso mix and cover bottom of dish. Layer with the cream mix and alternate until done. Top with Cocoa powder and chocolate shavings and refrigerate 4 hrs or overnight!

Gluten Free Pumpkin Bread with Wild Orange Glaze

Gluten Free Pumpkin Bread with Wild Orange Glaze

slightly adapted from this awesome recipe from Brandie at http://www.spoonandsaucer.com/gluten-free-pumpkin-bread/?crlt.pid=camp.ySpC6lN1AjBf

I honestly would LOVE to make this again with her eggnog glaze, but the SO Delicious coconut eggnog that I love is not easily available here, so I may have to wait until we go out of town and then bring a cooler to stock up (it’s worth it, folks).Screen Shot 2015-11-05 at 1.54.33 PM

* This recipe is a double batch because you will be MAD if you make only one loaf. Trust me.

Pumpkin Bread
  • 3 cups Bob’s Red Mill Gluten Free 1:1 Baking Flour
  • 2 tablespoons pumpkin pie spice (I ran out, so I did 1 Tbsp pumpkin pie spice, then added some fresh ground nutmeg, 2 tsp cinnamon, some ginger, clove and allspice)
  • 4 teaspoons baking powder
  • 1 teaspoon kosher salt
  • 4 large eggs
  • 3/4 cup applesauce
  • 1/4 cup oil
  • 1 drop Cassia Essential Oil**
  • 6-8 drops Lemon Essential Oil**
  • 3/4 cup granulated sugar
  • 1/4 cup brown sugar
  • 1 cup pumpkin puree
Wild Orange Glaze
  • 1/2 cup powdered sugar
  • 1 tablespoon water (or more as needed)
  • 2 drops Wild Orange Essential Oil**
Instructions
GF Pumpkin Bread
  1. Preheat oven to 350F
  2. Grease 2 loaf pans.
  3. In a large bowl, mix dry ingredients (flour through salt) with a whisk until well combined.
  4. In a separate medium bowl, whisk together all the wet ingredients until well combined.
  5. Add the wet ingredients to the dry, and mix just until there are no dry clumps, being careful not to overmix.
  6. Pour the mixture into your greased loaf pan, and bake for appx an hour, or until golden brown, and a knive or toothpick comes out clean.
  7. Remove from the oven, and cool on a wire rack.
Wild Orange Glaze
  1. Put the powdered sugar in a cup, and add the water.
  2. Whisk until the glaze is thick, and smooth and add in the Wild Orange oil.
  3. Drizzle on the bread, and let it sit until the glaze has dried out a bit.
  4. Slice and enjoy!** I use only 100% pure therapeutic Grade Essential Oils that are batch tested for purity and safe for internal use. Contact me if you would info on where to get these essential oils.

liquid garam masala

So I love the flavors of curry, but can’t take the heat with most pre-made sauces. With the allergies here we have to make everything from scratch anyway, so I’ve developed a quick and easy way (NOTE:: not claiming it is authentic) to make a yummy curry dish here at home with whatever we have at the time… and use our amazing doTERRA oils to flavor it!
liquid garam masala
Here is my loose ‘recipe’ that you can follow and modify at will:

MEAT & VEGGIES:

  • about 2 lbs of bite sized chopped meat (beef or chicken)
  • 1 onion chopped
  • 1 head cauliflower, chopped (we’ve also added potatoes before)
  • several carrots, chopped
  • 1 small carton of grape or cherry tomatoes
  • 1 jar of Majestic Garlic curried garlic (this stuff is not easy to find, but is AMAZING). I apologize if most of you can’t get this bc IMO it really makes the dish. If you can’t get it, any whole pickled garlic cloves may also be a good substitute. I put in a LOT.

SAUCE:

  • 1 can of organic fire roasted diced tomatoes
  • 3 small cans of organic coconut cream
  • a few TBSP of dairy free butter

SEASONING:

  • several TBSP of mild curry powder
  • about 2 TBSP of cumin
  • a few drops of doTERRA lime essential oil
  • 1 drop each of doTERRA Cardamom, Coriander, Ginger, Cinnamon, Clove Bud, Black Pepper essential oils  (if you don’t have these yet, msg me and I can get them to you)
  • a dash of sugar to balance out the tomatoes
  • more cinnamon powder if needed
  • salt to taste

This week I started with some beef pieces cut into small bite-sized portions and marinated them ahead of time in some olive oil, salt and a can of coconut cream (we usually use chicken).

Heat some olive oil in a pot (I like to use my enamel coated cast iron dutch oven) and cook up some chopped onion until tender. Add in the cauliflower, carrots and meat until meat is browned and veggies are tender.

Add in 1 can diced tomatoes, 2-3 cans of coconut cream (less if using the full sized cans, but mine were the really small cans) and butter. Throw in the grape tomatoes, garlic cloves and all seasonings and let it simmer until flavors are well blended. This one really requires you to customize the flavors to your liking, but that is what I love about making this dish!

Serve over brown jasmine rice. YUM!

Rosemary & Thyme Roasted Veggies

roasted veggiesThese are SO good. I never thought I’d get this excited about veggies, but seriously these are really that good….and easy.

1) Take whatever veggies you have in the fridge. I often like to use carrots, celery, tiny potatoes, grape tomatoes, onion, red peppers, okra, broccoli, etc etc. Remember: eat the rainbow! The more color and variety the better!

2) Chop them into bite sized pieces.

3) Spread them out in a large baking dish (the flatter the better) and coat them with my all time favorite rosemary & thyme infused olive oil. Toss them around until they are coated and lightly salt them with sea salt.

4) Bake at 400 for about an hour or until they are slightly toasted and crispy. You’ll want to shake them up and make sure they get really well cooked (I like them slightly burnt). Drizzle a tiny bit more of the rosemary & thyme oil on at the end and salt to taste. ENJOY!

Even the kiddos gobble these up. They’re the perfect way for anyone to devour a pan full of veggies, even if they supposedly don’t like veggies 🙂

{DIY} laundry detergent

About the time I had started using essential oils, I came across a killer deal on a super green cloth diaper friendly laundry detergent, so I bought a TON of it. I was so proud of myself for scoring that deal. Since then I have wanted to try making my own several times, but just had no need for it! I FINALLY (after almost 2 years) have run out of my stash, so this was my project! My first attempt I followed a traditional recipe that used borax and that was a big NO GO on my little ones sensitive skin. I made a massive batch, and had to give most of it away!
laundry_detergentMy REVISED detergent is now borax FREE and it seems to be working quite well so far. Here are the ingredients that I have switched to for our homemade laundry detergent

  • 2 cups washing soda
  • 1 cup baking soda
  • 1/2 cup of course sea salt or epsom salt
  • 1/2 cup of Biokleen oxygen bleach
  • 1 bar of castille soap finely grated (a cuisinart with a finer grater attachment works great to do this quickly)
  • 10 – 20 drops each of lavender and wild orange essential oils (I’ll change this up each time just for fun)

Dump it all into a container, mix it up, add in the essential oils, and there you go! Use about 1-2 Tbsp with each load, add in white vinegar with 2 drops of essential oil as the liquid fabric softener and run the load!


almond crusted pork loin with cranberry apple chutney

Ok so my husband and I have started the Paleo diet in an effort to reduce our intake of processed foods and refined sugars and improve our health and lifestyle. We are 1 week into it and not only am I feeling better and losing some weight, but I’m enjoying the fresh foods and planning recipes for our week in one sitting. I have stretched out of the box and prepared new dishes this week that will definitely be some of our family favorites from now on. I thought I’d share one on here and will post several for my own reference. Please forgive the vague measurements but I was ‘improvising’ as I went so I will have to refine the amounts next time I try and re-create this dish. The spiced Chutney makes a wonderful flavor for the holiday season!
Almond Crusted Pork Loin

  • 1 package of thin cut boneless pork loin chops (much thinner than regular pork chops)
  • 2 eggs
  • 1/4 c. coconut milk
  • 1 Tbsp honey
  • about 1 cup whole raw almonds
  • thyme, rosemary, black pepper, parsley

combine beaten egg, coconut milk and honey in a shallow pan

grind almonds in mini food processor until finely chopped, add spices to almond mixture/

sea salt and pepper the pork loin if desired

dip pork loin in egg wash, then coat in almond mixture

place coated pork loin on greased foil lined baking sheet and bake at 450 for appx 15-20 min (cooking time may vary so do not overcook)

Cranberry Apple Chutney

  • 1/2 cup dried cranberries
  • 1 granny smith apple, cored and finely chopped
  • white cooking wine
  • white vinegar
  • balsamic vinegar
  • ground ginger, allspice, cinnamon, cloves

 while pork is cooking, heat about 1 cup water in saucepan and bring to low boil

add cranberries and apples and cook until tender

while cooking, add some (appx 2 Tbsp each) white wine, white vinegar & balsamic vinegar along with a dash of all the spices

when apples are tender, pour mix into food processor and blend to desired consistency

spoon chutney onto almond crusted pork loin and serve

I served this dish with olive oil roasted asparagus. Let me know if you try it and love it as much as we did!


Rosemary & Thyme ‘cheesy’ popcorn

This is addictive. I am warning you. I am a popcorn fanatic and this is hands down my favorite ‘recipe’ for popcorn to date.
nutritional_yeast_pop
Here’s how to make the popcorn:

1) start out with a good quality popcorn kernel. Make sure you choose organic NON-GMO popcorn since most ‘corn’ out there is not. I like this organic popcorn from Arrowhead Mills (affiliate) from Amazon and can get it on subscribe and save delivered straight to my door whenever I want (my love for that service is documented in another post).

2) pop the popcorn on the stove

**For those who have never done this, here is a how-to on popping over the stove…
Get a nice large stock pot with a lid and cover the bottom of the pot with an oil of your choice and pour in kernels until the cover the bottom and are coated in oil (don’t skimp on the oil – make sure it sufficiently coats them all). Many people love using organic coconut oil. I have still had better results with a good quality extra virgin olive oil, but to each his own.

Have a large bowl ready and sitting next to the stove so when it starts popping you can quickly transfer it out. Cover your pot (a see-through lid is excellent for this process so you know what’s going on inside) and turn it on high heat. Let it sit until the popcorn starts rapidly popping and make sure to lift it slightly off the heat and shake it vigorously so as not to burn the bottom and let the unpopped kernels fall to the bottom. If the pot fills up, carefully (as not to burn yourself) lift part of the lid…just enough to let some of the popcorn fall out into your bowl and then keep going until it’s all popped. This can take some practice, so don’t give up if it isn’t perfect the first time. It is an art worth mastering!!

So dump all the fresh popcorn into your large bowl and now we can move on….

3) butter and salt the popcorn to your liking. Again, the quality of ingredients makes a big difference, so if possible use real, organic butter and a good quality sea salt. If you’re worried about the calories rising before your eyes, you can skip the butter step and go straight to the rosemary & thyme olive oil. If not, the flavor is amazing with both 🙂

4) take your rosemary & thyme infused olive oil (if you don’t already have this on hand, see instructions below) and drizzle it liberally on the popcorn. Toss it and do it again. Take a few pieces just to make sure it’s delicious.

**Since you’ll want to make this popcorn regularly (and I use this infused oil on just about every dish that leaves the kitchen now), do yourself a favor and make sure you have a batch of my rosemary and thyme infused olive oil stocked in your kitchen. Trust me – you’ll want this on hand. You can make it up in single use batches, but you’ll kick yourself for not making a whole vat of it. Just drop about 8 drops of each into an 8 oz GLASS container of EVOO.

**DISCLAIMER** You can NOT ingest many essential oils on the market. I don’t want you to get really sick, so don’t try this with any that are not safe for internal use. For more information on getting your own essential oils, feel free to contact me on the about page.

5) grab your nutritional yeast and start shaking it on. By this time you’ve already buttered and salted the popcorn to your liking so this is just icing on the cake. I like to coat and toss the batch several times so that each piece has it’s fair share of nutritional yeast 🙂 I like this Braggs Nutritional Yeast (affiliate), but there are some other good ones out there too.

Nutritional Yeast has a delicious ‘cheesy’ flavor and is loaded with good B vitamins which are essential to our health. For vegans (or those like us who are allergic to dairy and can’t enjoy and real cheese), this gives an excellent flavoring option. You can learn more about the benefits of Nutritional Yeast here.

6) this is entirely optional, but I love to crush fresh dried herbs on top just to make it that much more beautiful and delicious. I have had an abundance of dried cilantro lately and it gives a nice compliment to the flavors. You can sprinkle on any dried herbs that you’d like.

7) go hide in a corner so that your family doesn’t completely devour the entire bowl and leave you without. haha. j/k but be prepared to make another batch. it goes fast!

Beef Bone Broth

OK so I have made my own stock before with chicken and turkey, but I was more intimidated to make beef bone broth. With the chilly temps today and a few little ones needing an extra immunity boost, I knew it was time to just jump in and get this going! Our pediatrician highly recommended that we incorporate homemade bone broth into our diets on a regular basis, so here we go! I followed a lot of the steps from this recipe from Nourished Kitchen http://nourishedkitchen.com/beef-stock-recipe/

I started out with 9 lbs of assorted organically raised beef bone parts. I consulted the farmer directly on this since I figured he’d be a pretty good resource. I had a bag of oxtails, a few feet (cross-cut), several split marrow, a hefty beef shank with a little meat on it, and a few other things I should have written down. So I pulled out my massive roasting dish, set the oven to 400 degrees, drizzled olive oil down and put all that in the oven for a bit.

The best thing is to save a bag full of veggie ‘scraps’ for your broth as you chop veggies for meal prepping. I hadn’t been saving them up to this point, so for my first attempt I just chopped a few bunches of organic celery and used the ends and leafy parts, threw in a bag of organic carrots, several organic onions and about a pint of organic mushrooms. Roasting veggies makes them taste AMAZING, so why not do that with the stock, right? I threw all these chunked up veggies onto the top of the bones and let it all roast together. I left them in for about an hour and a half (until I knew I had to move on to the next step and still make it to bed at a decent hour).

20141102-065958.jpg
This is the part I don’t have an exact science for, since the bones and amounts that I have are so different each time. I have a massive stock pot so I pulled that out onto the stove and then got out my large crock pot as a back-up simmering station.

I divided all of the roasting pan goodies into the stock pot and crock pot, filled them both up with water and brought it to a boil. Once it was boiling, turned it down to a simmer and added in 2 Tbsp of organic apple cider vinegar and a dash of cinnamon (because I cannot make a beef dish without it lately). I’m obsessed with cinnamon.

Do NOT add salt to your bone broth, as it will condense down and can become too much as the stock thickens. Better to add it to the final dishes as needed when you actually use the broth.

So it has been there on a low simmer all night and the house smells yummy.

20141102-074436.jpg
Can’t wait to sip some of this for our lunch today! It is good straight up with a dash of seasoning, or I add it as the base for ALL of my home made soup recipes which we make frequently…especially in these chilly months! Let me know how yours turns out!

Roasted Butternut Squash Soup

Nothing says Happy Halloween like a fresh pot of homemade roasted butternut squash soup!

The more I have learned of the evils of candy (sounds dramatic, but seriously most of the stuff is SO dangerous and wreaks havoc on our systems and especially the kiddos) the more I want the fall festivities to be focused on family, real food and great memories! So Halloween will be dressing up creating costumes, and enjoying our bowl of delicious butternut squash soup while passing out glow sticks to our friends and neighbors.

No sugar highs, no tummy aches, no neurotoxins flooding their bodies, just good real food and fun! They really don’t care about the candy if it is not made to be about that, so for now we’ll go with this!

Delicious homemade butternut squash soup is SO easy with a little advanced prep. The key is to roast the butternut squash a day or two before you need it.

Here’s the recipe:

About 4 small organic butternut squash

To roast, cut the squash in half, scoop out the seeds and roast face down on a baking sheet greased with olive oil for about an 30 min to an hour at high heat (400). Roast until soft. Then scoop the squash out of the skin and discard the skin.

3-4 organic onions, chopped
3-4 tbsp olive oil
32-48 oz organic chicken broth or stock
2 Tbsp chopped garlic
2 tsp ground cinnamon
1-2 cups milk of choice (I used flax seed milk)
2 Tbsp rosemary and thyme infused olive oil (made with essential oils)
Fresh organic dried parsley
Salt and pepper to taste

If you have pre-roasted the squash and just stored it in the fridge, this could not be easier.

Chop the onion and sauté it in the olive oil until caramelized.
Turn burner to low.

20141031-164211.jpg

Add 1 large box of chicken stock and the garlic and throw in all the roasted butternut squash.

At this point you can use an immersion blender, or transfer it in batches to a vitamix and purée it all. I add in 1-2 cups of milk and extra stock through this process to get all the good squash purée off the sides of the blender.

Once it is smooth and creamy, add ground cinnamon, drizzle a few Tbsp of the rosemary and thyme olive oil over the top and stir it in. This stuff is liquid GOLD for flavoring all my homemade soups.

Add in salt to taste and grind fresh pepper over the top. Crumble some fresh dried parsley on and enjoy!

20141031-164342.jpg

Cilantro Lime and Wild Orange Brown Rice

20140128-201541.jpg

As if the oils weren’t amazing enough for their therapeutic benefits, there are several that you want to have on hand in the kitchen for instant flavor twists on the most basic recipes.

Tonight’s plain dinner was instantly transformed by throwing some cilantro into our brown rice and then adding about 3 drops of dōTERRA lime oil and drizzling on my dōTERRA wild orange infused olive oil. Instant flavor that perfectly complimented our garlic lime pork chops and pineapple!